Media Recap 2015 - II

Posted on Wed 02 December 2015 • Tagged with Media Recap

After watching TotalBiscuit’s video for There Came an Echo I wasn’t really into playing the game, but when the soundtrack went up at Big Giant Circles I couldn’t pass it up. Bought it some time ago and still love it, especially “Ignite Defense” and “LAX” (those are great Audiosurf tracks, BTW).

You should really listen to the soundtrack.

Video Games

  • Audiosurf 2 (Steam, formerly Early Access)
  • Deponia (Steam) - Hard to like the game given that none of its characters is written in a likable way. It does contain some rememorable scenes though. “Rufus has stolen the screws from the children’s merry-go-round.”
  • Dragon Age 2 (Xbox 360) - Playing again with all the DLC to show the girlfriend how constrained the team was making this, as well as how great the dialogue was.
  • Guild of Dungeoneering (Steam) - Yes, you can actually sell games based on their trailer soundtrack.
  • Halo 1 (Xbox One, Master Chief Collection) - Bought this one together with my Xbox One in order to relive the old times. Have fond memories of ploughing through the actual Halo 1 with Martin.
  • Halo Spartan Ops (Xbox One, Master Chief Collection) - Unless I got something wrong this seems to be the multiplayer replacement for Firefight. I loved ODST’s Firefight and am deeply disappointed by this. I used Firefight as a kind of training ground for the campaign, but the Spartan Op I played solo was boring.
  • Ironcast (Steam) - I couldn’t resist buying a new “match 3” game, especially one with elements of a roguelike. It was marked down during the Steam Exploration sale. Like this one quite a lot. I wish I had found the ‘skip’ button in dialogues earlier though. I accidentally clicked away quite some choices.
  • Kingdom (Steam) - Beautiful indie title which is deeper than one would expect at first sight.
  • Kingdom Hearts Re:Chain of Memories HD (Playstation 3) - Last time I played this game was a pirated version of the Game Boy Advance edition some years ago. Still, the later boss fights were as tough as I remembered them and I tended to switch off the PS3 due to rising anger at least one per boss fight in the mid-section.
  • Life is Strange (Xbox One) - While I am not as heavily into Life is Strange as my girlfriend, I can acknowledge it for the interesting and original game that it is. Its contemporary theme struck a nerve for the both of us.
  • Rune Factory 4 (Nintendo 3DS)
  • Secret Files 3 (Steam) - Disappointing. Feels incomplete, almost like sentence.
  • Starbound (Steam, Early Access)
  • Startopia (Steam) - Felt nostalgic. Initially played this title years ago when I borrowed it from Lukas.
  • Terraria (Steam) - Terraria has arrived on the Mac. I don’t need to say more.
  • The Witcher 3 (Xbox One) - Holy… I adore the Witcher books and absolutely, wholeheartedly recommend The Witcher 3 to anyone on the look for a gritty, mature and sarcastic fantasy adventure RPG. I played this with the girlfriend on a completionist run. The game and its awesome first expansion Hearts of Stone kept us busy from June to November.

Books

It’s a Witcher book aside from the main five books which was an entertaining read. Then there’s Jennifer Estep’s series about an assassin which had the usual fault of her books: She is explaining everything in every book in minuscule detail again even though many people will either still remember or read the books a binge.

Books by Richard Schwartz

I bought a stack of books from the friend of a friend who wanted to clear house. Those turned out to be very entertaining fantasy novels by Richard Schwartz. I haven’t read the single titles in this universe yet, but due to traveling I spent some iTunes credits on the later books in order to avoid packing more. I even turned on data roaming and bought one book in the train in Germany - that should give you a good impression how much I enjoyed the series so far.

  • Das erste Horn
  • Die zweite Legion
  • Das Auge der Wüste
  • Der Herr der Puppen
  • Die Feuerinseln
  • Der Kronrat
  • Die Rose von Illian
  • Die weiße Flamme
  • Das blutige Land
  • Die Festung der Titanen
  • Die Macht der Alten

Movies

I’ve suggested watching the Fast and the Furious movies since I like them and in turn I watched the Harry Potter ones since I didn’t know them. Due to conflicts of time and interest we haven’t seen the last two Potters yet.

I recommend Inside Out. I can’t remember when I’ve had such a nice time in cinema. It’s easily my favorite movie of the year. Yeah, don’t go and watch Minions - it’s disappointing and weak.

  • Fast and the Furious, The
  • Fast and the Furious, The: Tokyo Drift
  • Fracture (Netflix, DE: Das perfekte Verbrechen)
  • Harry Potter and the Philosopher’s Stone
  • Harry Potter and the Chamber of Secrets
  • Harry Potter and the Prisoner of Azkaban
  • Harry Potter and the Goblet of Fire
  • Harry Potter and the Order of the Phoenix
  • Harry Potter and the Half-Blood Prince
  • Inside Out (cinema, DE: Alles steht Kopf)
  • Jumper (Netflix)
  • Minions (cinema)
  • Transporter, The (Netflix)
  • V for Vendetta (Netflix)
  • xXx (Netflix)

Videos on Netflix

The Netflix series consumption has been more or less the same. Some Grimm, some Sherlock, a lot of Elementary. I have also checked out a documentary series about famous chefs which proved to be interesting.

Presentations

Podcasts


Using Continuous Integration for puppet

Posted on Sun 01 November 2015 • Tagged with Institute for Computer Vision and Computer Graphics, Work

I’ll admit the bad stuff right away. I’ve been checking in bad code, I’ve had wrong configuration files on our services and it’s happened quite often that files referenced in .pp manifests have had a different name than the one specified or were not moved to the correct directory during refactoring. I’ve made mistakes that in other languages would’ve been considered “breaking the build”.

Given that most of the time I’m both developing and deploying our puppet code I’ve found many of my mistakes the hard way. Still I’ve wished for a kind of safety net for some time. Gitlab 8.0 finally gave me the chance by integration easy to use CI.

  • This post was updated once (2016-08-28)

Getting started with Gitlab CI

  1. Set up a runner. We use a private runner on a separate machine for our administrative configuration (puppet, etc.) to have a barrier from the regular CI our researchers are provided with (or, as of the time of this writing, will be provided with soonish). I haven’t had any problems with our docker runners yet.
  2. Enable Continuous Integration for your project in the gitlab webinterface.
  3. Add a gitlab-ci.yml file to the root of your repository to give instructions to the CI.

Test setup

I’ve improved the test setup quite a bit before writing this and aim to improve it further. I’ve also considered making the tests completely public on my github account, parameterize some scripts, handle configuration specific data in gitlab-ci.yml and using the github repository as a git submodule.

before script

In the before_script section which is run in every instance immediately before a job is run, I set some environment variables and run apt‘s update procedure once to ensure only the latest versions of packages are installed when packages are requested.

before_script:
  - export DEBIAN_FRONTEND=noninteractive
  - export NOKOGIRI_USE_SYSTEM_LIBRARIES=true
  - apt-get -qq update
  • DEBIAN_FRONTEND is set to suppress configuration prompts and just tell dpkg to use safe defaults.
  • NOKOGIRI_USE_SYSTEM_LIBRARIES greatly reduces build time for ruby‘s native extensions by not building its own libraries which are already on the system.

Optimizations

  • Whenever apt-get install is called, I supply -qq and -o=Dpkg::Use-Pty=0 to reduce the amount of text output generated.
  • Whenever gem install is called, I supply --no-rdoc and --no-ri to improve installation speed.

Puppet tests

All tests which I consider to belong to puppet itself run in the build stage. As is usual with Gitlab CI, only if all tests in this stage pass, the tests in the next stage will be run. Given that sanity checking application configurations which puppet won’t be able to apply doesn’t make a lot of sense, I’ve moved those checks into another stage.

I employ two of the three default stages for gitlab-ci: build and test. I haven’t had the time yet to build everything for automatic deployment after all tests pass using the deploy stage.

puppet:
  stage: build
  script:
    - apt-get -qq -o=Dpkg::Use-Pty=0 install puppet ruby-dev
    - gem install --no-rdoc --no-ri rails-erb-lint puppet-lint
    - make libraries
    - make links
    - tests/puppet-validate.sh
    - tests/puppet-lint.sh
    - tests/erb-syntax.sh
    - tests/puppet-missing-files.py
    - tests/puppet-apply-noop.sh
    - tests/documentation.sh

While puppet-lint exists as .deb file, this installs it as a gem in order to have Ubuntu docker containers running the latest puppet-lint.

I use a Makefile in order to install the dependencies of our puppet code quickly as well as to create symlinks to simplify the test process instead of copying files around the test VM.

libraries:
  @echo "Info: Installing required puppet modules from forge.puppetlabs.com."
  puppet module install puppetlabs/stdlib
  puppet module install puppetlabs/ntp
  puppet module install puppetlabs/apt --version 1.8.0
  puppet module install puppetlabs/vcsrepo

links:
  @echo "Info: Symlinking provided modules for CI."
  ln -s `pwd`/modules/core /etc/puppet/modules/core
  ln -s `pwd`/modules/automation /etc/puppet/modules/automation
  ln -s `pwd`/modules/packages /etc/puppet/modules/packages
  ln -s `pwd`/modules/services /etc/puppet/modules/services
  ln -s `pwd`/modules/users /etc/puppet/modules/users
  ln -s `pwd`/hiera.yaml /etc/puppet/hiera.yaml

As you can see, I haven’t had the chance to migrate to puppetlabs/apt 2.x yet.

puppet-validate

I use the puppet validate command on every .pp file I come across in order to make sure it is parseable. It is my first line of defense given that files which are not even able to make it pass the parser are certainly not going to do what I want in production.

#!/bin/bash
set -euo pipefail

find . -type f -name "*.pp" | xargs puppet parser validate --debug

puppet-lint

While puppet-lint is by no means perfect, I like to make it a habit to enable linters for most languages I work with in order for others to have an easier time reading my code should the need arise. I’m not above asking for help in a difficult situation and having readable output available means getting help for your problems will be much easier.

#!/bin/bash
set -euo pipefail

# allow lines longer then 80 characters
# code should be clean of warnings

puppet-lint . \
--no-80chars-check \
--fail-on-warnings \

As you can see I like to consider everything apart from the 80 characters per line check to be a deadly sin. Well, I’m exaggerating but as I said, I like to have things clean when working.

erb-syntax

ERB is a Ruby templating language which is used by puppet. I have only ventured into using templates two or three times, but that has been enough to make me wish for extra checking there too. I initially wanted to use rails-erb-check but after much cursing rails-erb-lint turned out to be easier to use. Helpfully it will just scan the whole directory recursively.

#!/bin/bash
set -euo pipefail

rails-erb-lint check

puppet-missing-files

While I’ve used puppet-lint locally previously it caught fewer errors than I would’ve liked due to it not checking whether files I sourced for files or templates existed. I was negatively surprised upon realizing that puppet validate didn’t do that either, so I slapped together my own checker for that in Python.

Basically the script first builds a set of all .pp files and then uses grep to check for lines specifying either puppet: or template( which are telltale signs for files or templates respectively. Then each entry of said entry is verified by checking for its existence as either a path or a symlink.

#!/usr/bin/env python2
"""Test puppet sourced files and templates for existence."""

import os.path
import subprocess
import sys


def main():
    """The main flow."""

    manifests = get_manifests()
    paths = get_paths(manifests)
    check_paths(paths)


def check_paths(paths):
    """Check the set of paths for existence (or symlinked existence)."""

    for path in paths:
        if not os.path.exists(path) and not os.path.islink(path):
            sys.exit("{} does not exist.".format(path))


def get_manifests():
    """Find all .pp files in the current working directory and subfolders."""

    try:
        manifests = subprocess.check_output(["find", ".", "-type", "f",
                                             "-name", "*.pp"])
        manifests = manifests.strip().splitlines()
        return manifests
    except subprocess.CalledProcessError, error:
        sys.exit(1, error)


def get_paths(manifests):
    """Extract and construct paths to check."""

    paths = set()

    for line in manifests:
        try:
            results = subprocess.check_output(["grep", "puppet:", line])
            hits = results.splitlines()

            for hit in hits:
                working_copy = hit.strip()
                working_copy = working_copy.split("'")[1]
                working_copy = working_copy.replace("puppet://", ".")

                segments = working_copy.split("/", 3)
                segments.insert(3, "files")

                path = "/".join(segments)
                paths.add(path)

        # we don't care if grep does not find any matches in a file
        except subprocess.CalledProcessError:
            pass

        try:
            results = subprocess.check_output(["grep", "template(", line])
            hits = results.splitlines()

            for hit in hits:
                working_copy = hit.strip()
                working_copy = working_copy.split("'")[1]

                segments = working_copy.split("/", 1)
                segments.insert(0, ".")
                segments.insert(1, "modules")
                segments.insert(3, "templates")

                path = "/".join(segments)
                paths.add(path)

        # we don't care if grep does not find any matches in a file
        except subprocess.CalledProcessError:
            pass

    return paths

if __name__ == "__main__":
    main()

puppet-apply-noop

In order to perform tests on the most common tests in puppet world, I wanted to test every .pp file in a module’s tests directory with puppet apply --noop, which is a kind of dry run. This outputs information what would be done in case of a real run. Unfortunately this information is highly misleading.

#!/bin/bash
set -euo pipefail

content=(core automation packages services users)

for item in ${content[*]}
do
  printf "Info: Running tests for module $item.\n"
  find modules -type f -path "modules/$item/tests/*.pp" -execdir puppet apply --modulepath=/etc/puppet/modules --noop {} \;
done

When run in this mode, puppet does not seem to perform any sanity checks at all. For example, it can be instructed to install a package with an arbitrary name regardless of the package’s existence in the specified (or default) package manager.

Upon deciding this mode was not providing any value to my testing process I took a stab at implementing “real” tests instead by running puppet apply instead. The value added by this procedure is mediocre at best, given that puppet returns 0 even if it fails to apply all given instructions. Your CI will not realize that there have been puppet failures at all and happily report your build as passing.

puppet provides the --detailed-exitcodes flag for checking failure to apply changes. Let me quote the manual for you:

Provide transaction information via exit codes. If this is enabled, an exit code of ´2´ means there were changes, an exit code of ´4´ means there were failures during the transaction, and an exit code of ´6´ means there were both changes and fail‐ ures.

I’m sure I don’t need to point out that this mode is not suitable for testing either given that there will always be changes in a testing VM.

Now, one could solve this by writing a small wrapper around the puppet apply --detailed-exitcodes call which checks for 4 and 6 and fails accordingly. I was tempted to do that. I might still do that in the future. The reason I didn’t implement this already was that actually applying the changes slowed things down to a crawl. The installation and configuration of a gitlab instance added more than 90 seconds to each build.

A shortened sample of what is done in the gitlab build:

  • add gitlab repository
  • make sure apt-transport-https is installed
  • install gitlab
  • overwrite gitlab.rb
  • provide TLS certificate
  • start gitlab

Should I ever decide to implement tests which really apply their changes, the infrastructure needed to run those checks for everything we do with puppet in a timely manner would drastically increase.

documentation

I am adamant when it comes to documenting software since I don’t want to imagine working without docs, ever.

In my Readme.markdown each H3 header is equivalent to one puppet class.

This test checks whether the amount of documentation in my preferred style matches the amount of puppet manifest files (.pp). If the Readme.markdown does not contain exactly the same amount of ### headers as there are puppet manifest files then it counts as a build failure since someone obviously missed to update the documentation.

#!/bin/bash
set -euo pipefail

count_headers=`grep -e "^### " Readme.markdown|wc -l|awk {'print $1'}`
count_manifests=`find . -type f -name "*.pp" |grep -v "tests"|wc -l|awk {'print $1'}`

if test $count_manifests -eq $count_headers
  then printf "Documentation matches number of manifests.\n"
  exit 0
else
  printf "Documentation does not match number of manifests.\n"
  printf "There might be missing manifests or missing documentation entries.\n"
  printf "Manifests: $count_manifests, h3 documentation sections: $count_headers\n"
  exit 1
fi

Application tests

As previously said I use the test stage for testing configurations for other applications. Currently I only test postfix‘s /etc/aliases file as well as our /etc/postfix/forwards which is an extension of the former.

applications:
  stage: test
  script:
      - apt-get -qq -o=Dpkg::Use-Pty=0 install postfix
      - tests/postfix-aliases.py

Future: There are plans for handling both shorewall as well as isc-dhcp-server configurations with puppet. Both of those would profit from having automated tests available.

Future: The different software setups will probably be done in different jobs to allow concurrent running as soon as the CI solution is ready for general use by our researchers.

postfix-aliases

In order to test the aliases, an extremely minimalistic configuration for postfix is installed and the postfix instance is started. If there is any output whatsoever I assume that the test failed.

Future: I plan to automatically apply both a minimal configuration and a full configuration in order to test both the main server and relay configurations for postfix.

#!/usr/bin/env python2
"""Test postfix aliases and forwards syntax."""

import subprocess
import sys


def main():
    """The main flow."""
    write_configuration()
    copy_aliases()
    copy_forwards()
    run_newaliases()


def write_configuration():
    """Write /etc/postfix/main.cf file."""

    configuration_stub = ("alias_maps = hash:/etc/aliases, "
                          "hash:/etc/postfix/forwards\n"

                          "alias_database = hash:/etc/aliases, "
                          "hash:/etc/postfix/forwards")

    with open("/etc/postfix/main.cf", "w") as configuration:
        configuration.write(configuration_stub)


def copy_aliases():
    """Find and copy aliases file."""

    aliases = subprocess.check_output(["find", ".", "-type", "f", "-name",
                                       "aliases"])
    subprocess.call(["cp", aliases.strip(), "/etc/"])


def copy_forwards():
    """Find and copy forwards file."""

    forwards = subprocess.check_output(["find", ".", "-type", "f", "-name",
                                        "forwards"])
    subprocess.call(["cp", forwards.strip(), "/etc/postfix/"])


def run_newaliases():
    """Run newaliases and report errors."""

    result = subprocess.check_output(["newaliases"], stderr=subprocess.STDOUT)
    if result != "":
        print result
        sys.exit(1)

if __name__ == "__main__":
    main()

Conclusion

While I’ve ran into plenty frustrating moments, building a CI for puppet was quite fun and I’m constantly thinking about how to improve this further. One way would be to create “real” test instances for configurations, like “spin up one gitlab server with all its required classes”.

The main drawback in our current setup was two-fold:

  1. I haven’t enabled more than one concurrent instances of our private runner.
  2. I haven’t considered the performance impact of moving to whole instance testing in other stages and parallelizing those tests.

I look forward to implementing deployment on passing tests instead of my current method of automatically deploying every change in master.


Update (2016-08-28)

Prebuilt Docker image

In order to reduce the run time for each build I eventually decided to prebuild our Docker image. I’ve also enabled automatic builds for the repository by linking our Docker Hub account with our GitHub organisation. This was easy and quick to set up. Mind you that similar setups using GitLab have become possible in the mean time. This is a solution with relatively little maintenance as long as you don’t forget to add the base image you use as a dependency in the Docker Hub settings.

FROM buildpack-deps:trusty
MAINTAINER Alexander Skiba <alexander.skiba@icg.tugraz.at>

ENV DEBIAN_FRONTEND noninteractive

RUN apt-get update && apt-get install -y \
    isc-dhcp-server \
    postfix \
    puppet \
    ruby-dev \
    rsync \
    shorewall \
 && apt-get clean \
 && rm -rf /var/lib/apt/lists/*

RUN gem install --no-rdoc --no-ri \
    puppet-lint \
    rails-erb-lint

Continuous Deployment

When using CD, you want to have two runners on your puppetmaster. The Docker runner in which you test your changes and a shell runner with which you deploy your changes.

That’s what our .gitlab-ci.yml looks like.

puppet:
  stage: build
  script:
    - tests/puppet-validate.sh
    - tests/puppet-lint.sh
    - tests/erb-syntax.sh
    - tests/puppet-missing-files.py
    - tests/documentation.sh
    - tests/postfix-aliases.py
    - tests/dhcpd.sh
    - tests/dhcpd-todos.sh
    - tests/shorewall.sh
  tags:
    - puppet
    - ubuntu trusty

puppetmaster:
  stage: deploy
  only:
    - master
  script:
    - make modules
    - sudo service apache2 stop
    - rsync --omit-dir-times --recursive --group --owner --links --perms --human-readable --sparse --force --delete --stats . /etc/puppet
    - sudo service apache2 start
  tags:
    - puppetmaster
  environment: production

As you can see, there are no installation steps in the puppet job anymore, those have moved into the Dockerfile. The deployment consists of installing all the modules and rsyncing the files into the Puppet directory for use as soon as the server is started again. I chose to stop and start the server as a precaution since I prefer a “Puppet is down” message to incomplete Puppet runs in case a client gets an inconsistent state.

We also use the environment instruction to easily display the currently deployed commit in the GitLab interface.

In order for this to work easily and transparently, I’ve updated the Makefile.

INSTALL := puppet module install
TARGET_DIR := `pwd`/modules
TARGET := --target-dir $(TARGET_DIR)

modules:
  @echo "Info: Installing required puppet modules from forge.puppetlabs.com."
  mkdir -p $(TARGET_DIR)
  # Puppetlabs modules
  $(INSTALL) puppetlabs-stdlib $(TARGET)
  $(INSTALL) puppetlabs-apt $(TARGET)
  $(INSTALL) puppetlabs-ntp $(TARGET)
  $(INSTALL) puppetlabs-rabbitmq $(TARGET)
  $(INSTALL) puppetlabs-vcsrepo $(TARGET)
  $(INSTALL) puppetlabs-postgresql $(TARGET)
  $(INSTALL) puppetlabs-apache $(TARGET)

  # Community modules
  $(INSTALL) REDACTED $(TARGET)


test:
  @echo "Installing manually via puppet from site.pp."
  puppet apply --verbose /etc/puppet/manifests/site.pp

.PHONY: modules test

A major difference to before is the installation of puppet modules into the current path after testing instead of installing them directly into the Puppet directory. This also serves to prevent deploying an inconsistent state into production in case something couldn’t be fully downloaded. Furthermore this assures we are always using the most recent released version to get bugfixes.


Notes

  • Build stages do run after each other, however, they do not use the same instance of the docker container and therefore are not suited for installing prerequisites and running tests in different stages. Read: If you need an additional package in every stage, you need to install it during every stage.
  • If you are curious what the set -euo pipefail commands on top of all my shell scripts do, refer to Aaron Maxwell’s Use the Unofficial Bash Strict Mode.
  • Our runners as of the time of this writing use buildpack-deps:trusty as their image. We use a custom image now.
Retaining your sanity while working on SWEB

Posted on Fri 14 August 2015 • Tagged with University

  • This post was updated 2 times.

I’ll openly admit, I’m mostly complaining. This is part of who I am. Mostly I don’t see things for how great they are, I just see what could be improved. While that is a nice skill to have, it often gives people the impression that I’m not noticing all the good stuff and only ever talk about negative impressions. That’s wrong. I try to make things better by improving them for everyone.

Sometimes that involves a bit of ranting or advice which may sound useless or like minuscule improvements to others. This post will contain a lot of that. I’ll mention small things that can make your work with your group easier.

Qemu

Avoid the “Matrix combo”

You are working in a university setting, and probably don’t spend your time in a dark cellar at night staring into one tiny terminal window coding in the console. Don’t live like that - unless you really enjoy it.

Set your qemu console color scheme to some sensible default, like white on black or black on white instead of the Matrix-styled green on black.

In common/source/kernel/main.cpp:

-term_0->initTerminalColors(Console::GREEN, Console::BLACK);
+term_0->initTerminalColors(Console::WHITE, Console::BLACK);

Prevent automatic rebooting

Update: I’ve submitted a PR for this issue: #55 has been merged.

When you want to try and find a specific problem which causes your SWEB to crash, you don’t want qemu to automatically reboot and cause your terminal or log to become full with junk. Fortunately you can disable automatic rebooting.

In arch/YOUR_ARCHITECTURE/CMakeLists.include (e.g. x86/32):

- COMMAND qemu-system-i386 -m 8M -cpu qemu32 -hda SWEB-flat.vmdk -debugcon stdio
+ COMMAND qemu-system-i386 -m 8M -cpu qemu32 -hda SWEB-flat.vmdk -debugcon stdio -no-reboot

- COMMAND qemu-system-i386 -no-kvm -s -S -m 8M -hda SWEB-flat.vmdk -debugcon stdio
+ COMMAND qemu-system-i386 -no-kvm -s -S -m 8M -hda SWEB-flat.vmdk -debugcon stdio -no-reboot

Automatically boot the first grub entry

If you are going for rapid iteration, you’ll grow impatient always hitting Enter to select the first entry in the boot menu. Lucky you! You can skip that and boot directly to the first option. Optionally delete all other entries.

In utils/images/menu.lst:

default=0
timeout=0 

title = Sweb
root (hd0,0)
kernel = /boot/kernel.x

Code

Use Debug color flags different from black and white

The most popular color schemes for Terminal use one of two background colors - black and white. Don’t ever use those for highlighting important information unless you want your information to be completely unreadable in one of the most common setups. You can change them to any other color you like.

In common/include/console/debug.h:

-const size_t LOADER             = Ansi_White;
+const size_t LOADER             = Ansi_WHATEVER_YOU_LIKE;

-const size_t RAMFS              = Ansi_White;
+const size_t RAMFS              = Ansi_NOT_WHITE_OR_BLACK;

Use C++11 style foreach loops

You may use C++11 standard code, which brings many features of which I found the easier syntax for writing foreach loops most beneficial. This way of writing foreach loops is shorter and improves the readability of your code a lot.

This is the old style for iterating over a container:

typedef ustl::map<example, example>::iterator it_type;
for(it_type iterator = data_structure.begin();
  iterator != data_structure.end(); iterator++)
{
  iterator->doSomething();
  printf("This isn't really intuitive unless you've more experience with C++.\n");
}

This is the newer method I strongly suggest:

for(auto example: data_structure)
{
  example.doSomething();
  printf("This is much more readable.\n");
}

Have your code compile without warnings

Truth be told, this should go without saying. If your code compiles with warnings it is likely it does not do exactly what you want. We saw that a lot during the practicals. Parts that only looked like they did what you wanted but on a second glance turned out to be wrong were already hinted at by compiler warnings.

If you don’t know how to fix a compiler warning, look it up or throw another compiler at it. Since you are compiling with gcc and linting with clang you already have a good chance of being provided with at least one set of instructions on how to fix your code. Or, you know, ask your team members. You’re in this together.

Besides, this is about sanity. Here, it’s also about code hygiene.

Your code should be clean enough to eat off of. So take the time to leave your […] files better than how you found them. ~Mattt Thompson

Git

I assume you know the git basics. I am a naturally curious person when it comes to tech (and a slew of other topics) and know a lot of things that don’t have any relation to my previous work but I’ve been told that a lot of people don’t know the workflow around github which has become popular with open source. I’ll try to be brief. The same workflow can be applied to the gitlab software (an open source solution similar to github).

Let’s assume you want to make a change to an open source project of mine, homebrew-sweb. You’d go through the following steps:

  1. Click “fork” on my repository site.
  2. Create a new branch in your clone of the project.
  3. Make changes and commit them.
  4. Push your new branch to your remote.
  5. Click the “submit pull request” button.

This means you don’t have write access to their repository but they can still accept and merge your changes quickly as part of their regular workflow. Now, some projects may have differing requirements, e.g. you need to send your PRs to the develop branch instead of master.

A simpler version of this workflow can and should be used when working as a group. Basically use the existing steps without forking the repository.

Have feature branches

You don’t want people to work in master, you want to have one known good branch and others which are in development. By working in branches, you can try and experiment without breaking your existing achievements.

Working with branches that contain single features instead of “all changes by Alex” works better because you can merge single features more easily depending on their stability and how well you tested them. This goes hand in hand with the next point.

When working with Pull Requests this has another upside: A Pull Request is always directly linked to a branch. If the branch gets updated server-side, the PR is automatically updated too, helping you to always merge the latest changes. When a PR is merged, the corresponding branch can be safely deleted since all code up to the merge is in master. This helps you avoid having many stale branches. Please don’t push to branches with a PR again after merging.

Have a prefix in your branch names

Having a prefix in your branch name before its features signals to others who is responsible for a feature or branch. I used alx (e.g. alx-fork) to identify the branches I started and was the main contributor of.

Always commit into a feature branch

Committing directly into master is equal to not believing in code review. You don’t want to commit into master directly, ever. The only exception for this rule in the Operating Systems course is to pull from upstream.

Since you probably set up the IAIK repository as upstream, you would do the following to update your repository with fixed provided by the course staff:

git checkout master
git pull upstream master
git push origin master

When it comes to team discipline I will be the one enforcing the rules. If we agreed on never committing into master I will revert your commits in master even if they look perfectly fine.

Have your reviewers merge Pull Requests

Now, you might wonder why you wouldn’t just merge a PR someone found to be fine into master yourself. That is very simple. By having the reviewer click the Merge button, you can track who reviewed the PR afterwards.

Also, it doesn’t leave the bitter taste of “I’m so great that I can merge without review” in your mouth. :)

Make sure your pull requests can be automatically merged

Nobody likes merge conflicts. You don’t and your group members certainly don’t. Make sure your branch can be merged automatically without conflicts into master. That means that before opening a Pull Request, you rebase your branch from master.

git checkout master
git pull
git checkout your-feature-branch
git rebase master

Repeat this process if master was updated after you submitted your PR to make sure it still can be merged without conflicts.

I want to make one thing very clear: As the person sending the Pull Request, it is your responsibility to make sure it merges clean, not the maintainer’s nor the project leader’s.

The reasoning behind this is taken from open source projects: Whenever you submit a patch but do not intend to keep on working on the software, you are leaving the burden of maintaining your code on the main developer. The least you can do is make sure it fits into their existing code base without additional pain.

Conclusion

There is quite a lot you and your partners can do to make the term with Operating Systems go a lot smoother. Some of it has to do with tech others with communication and team discipline. In case you’re about to enroll in the course or already have, I wish you the best of luck!


I’ll talk to Daniel about some of those issues and which might be okay to change. He’s quite thoughtful about what to include and what not to accept for the project as it’s delivered to the students. I’ll see which suggestions can be sent upstream and update this post accordingly.


Retaining your sanity while working on SWEB is part 4 of Working on SWEB for the Operating Systems course:

  1. SWEB, qemu and a Macbook Air
  2. How to SWEB on your Mac with OS X
  3. Tools and their experiences with SWEB
  4. Retaining your sanity while working on SWEB

Tools and their experiences with SWEB

Posted on Fri 14 August 2015 • Tagged with University

In the first part of this three-part series on the Operating System practicals at TU Graz I’ll write about some tools that I used and how well (or not well) they worked for me and my team members.

You can read [part I][develop] about working directly without an intermediate VM on OS X [here][develop] and [part II][sanity] about retaining your sanity [here][sanity].

Sublime Text 3

I love to use Sublime Text. If you ask me it’s the nicest text editor ever made. While my licence for version 2 is still valid, I’ll gladly pay the upgrade price for version 3 as soon as it is released. It is by far the tool I use most: I write my blog posts in it and I also use it for all my coding needs. (Sublime Text is available for 70$.)

In order to help me with development on SWEB I installed a few plugins using the superb Package Control package manager. If you want to work with Sublime when ever possible, you can set your EDITOR environment variable for that in ~/.bash_profile:

export EDITOR='subl -w'

C Improved

C Improved provides better support for syntax highlighting of preprocessor macros as well as improved Goto Symbol (CMD + R) support for C. [github]

Clang Complete

Clang Complete provides completion hints based on LLVM’s source analysis instead of Sublime’s internal completion. Sublime’s completion is based on what strings are already in the current file. LLVM’s completion is more akin to an IDE, which properly suggests variables, function names and method names.

Clang Complete is not available in Package Control and needs to be installed manually via the instructions in its readme. [github]

I had to make some compromises though in order to get it to work properly.

  1. Add your include paths
  2. Set the C++ standard
  3. Remove the default include paths
  4. Add an additional preprocessor constant (e.g. SUBLIME)
  5. Specify the standard library included with SWEB as system library (read: “errors or warnings in here are not our fault.”)

The additional constant is necessary in order to override the architectural difference between OS X (defaults to 64 bits) and SWEB (defaults to 32 bits) when analyzing the code. It is necessary to modify an additional file in your SWEB source. This is only ever used for analysis and never touched during compilation.

Here’s my ClangComplete.sublime-settings file:

{
  "default_options":
  [
    "-std=c++11",
    "-I/Users/ghostlyrics/Repositories/sweb/arch/include/",
    "-I/Users/ghostlyrics/Repositories/sweb/arch/common/include",
    "-I/Users/ghostlyrics/Repositories/sweb/arch/x86/32/common/include",
    "-I/Users/ghostlyrics/Repositories/sweb/arch/x86/32/include",
    "-I/Users/ghostlyrics/Repositories/sweb/arch/x86/common/include",
    "-I/Users/ghostlyrics/Repositories/sweb/common/include/",
    "-I/Users/ghostlyrics/Repositories/sweb/common/include/console",
    "-I/Users/ghostlyrics/Repositories/sweb/common/include/fs",
    "-I/Users/ghostlyrics/Repositories/sweb/common/include/fs/devicefs",
    "-I/Users/ghostlyrics/Repositories/sweb/common/include/fs/minixfs",
    "-I/Users/ghostlyrics/Repositories/sweb/common/include/fs/ramfs",
    "-I/Users/ghostlyrics/Repositories/sweb/common/include/kernel",
    "-I/Users/ghostlyrics/Repositories/sweb/common/include/mm",
    "-I/Users/ghostlyrics/Repositories/sweb/common/include/util",
    "-I/Users/ghostlyrics/Repositories/sweb/userspace/libc/include/sys",
    "-I/Users/ghostlyrics/Repositories/sweb/userspace/libc/include",
    "-isystem/Users/ghostlyrics/Repositories/sweb/common/include/ustl",
    "-D SUBLIME"
  ],

  "default_include_paths":[],
}

And here is the modified part of arch/x86/32/common/include/types.h:

+#ifdef SUBLIME
+typedef unsigned long size_t;
+
+#else
 typedef uint32 size_t;
+
+#endif

Git Gutter

Git Gutter displays helpful little icons in the gutter (the area which houses the line numbers). I had to modify some of the settings in order to make it work well together with Sublimelinter which also wants to draw into the gutter. You’ll have to decide for yourself which icons you find more important and have those drawn later. [github]

My GitGutter.sublime-settings has only one entry:

"live_mode": true,

Sublimelinter + Sublimelinter-contrib-clang + Sublimelinter-annotations

SublimeLinter [github] helps your style by flagging all kinds of errors and warnings. The base package does not come with linters, you have to install compatible linters with the framework yourself.

The Sublimelinter-contrib-clang plugin [github] helps with C and C++ files while the Sublimelinter-annotations plugin [github] flags things like TODO:, FIXME and XXX which is helpful if you tend to annotate code in the files themselves - a habit I would like you to avoid if you have web tools available (e.g. github or a gitlab, but we’ll get to that later). - Code files should be reserved for actual code and documentation to that code, not philosophical or design debates.

Again, you’ll need to modify this in order to work well with GitGutter. You will also need to enter all the include paths again, since the settings are not shared between the plugins.

Here’s an abbreviated version of my SublimeLinter.sublime-settings file:

{
  "user": {
    "@python": 2,
    "delay": 0.15,
    "lint_mode": "background",
    "linters": {
      "annotations": {
        "@disable": false,
        "args": [],
        "errors": [
          "FIXME"
        ],
        "excludes": [],
        "warnings": [
          "TODO",
          "README"
        ]
      },
      "clang": {
        "@disable": false,
        "args": [],
        "excludes": [],
        "extra_flags": "-D SUBLIME -std=c++11 -isystem \"/Users/ghostlyrics/Repositories/sweb/common/include/ustl\"",
        "include_dirs": [
          "/Users/ghostlyrics/Repositories/sweb/arch/include",
          "/Users/ghostlyrics/Repositories/sweb/arch/common/include",
          "/Users/ghostlyrics/Repositories/sweb/arch/x86/32/common/include",
          "/Users/ghostlyrics/Repositories/sweb/arch/x86/32/include",
          "/Users/ghostlyrics/Repositories/sweb/arch/x86/common/include",
          "/Users/ghostlyrics/Repositories/sweb/common/include/",
          "/Users/ghostlyrics/Repositories/sweb/common/include/console",
          "/Users/ghostlyrics/Repositories/sweb/common/include/fs",
          "/Users/ghostlyrics/Repositories/sweb/common/include/fs/devicefs",
          "/Users/ghostlyrics/Repositories/sweb/common/include/fs/minixfs",
          "/Users/ghostlyrics/Repositories/sweb/common/include/fs/ramfs",
          "/Users/ghostlyrics/Repositories/sweb/common/include/kernel",
          "/Users/ghostlyrics/Repositories/sweb/common/include/mm",
          "/Users/ghostlyrics/Repositories/sweb/common/include/util",
          "/Users/ghostlyrics/Repositories/sweb/userspace/libc/include/sys",
          "/Users/ghostlyrics/Repositories/sweb/userspace/libc/include"
          ]
        },
    },
    "passive_warnings": false,
    "rc_search_limit": 3,
    "shell_timeout": 10,
    "show_errors_on_save": false,
    "show_marks_in_minimap": true,
    "wrap_find": true
  }
}

Slack

Communication with your team is essential.

Now, different people prefer different means of communication. Personally, I tend to dislike the slowness of e-mail, the invasion of privacy and inherent urgency of SMS and the awful mangling of source code and general formatting in most messengers (I’m looking at you, Skype. Go hide in a corner.) I recommend Slack. Slack has been gaining popularity amongst US companies and startups in general for a while now and I enjoyed the flexibility it offered our team:

We were able to easily post arbitrary files (e.g. .log with our Terminal output or .pdf with the draft for the design document) as well as post code snippets which can even be assigned a language for syntax highlighting. I also enjoyed link previews for pasted links and being able to easily quote blocks of text.

On top of that, add the fantastic integration with Github which allowed us to get notifications in a channel on different kinds of development activity, like Pushes, comments on code (for code review) and Pull Requests.

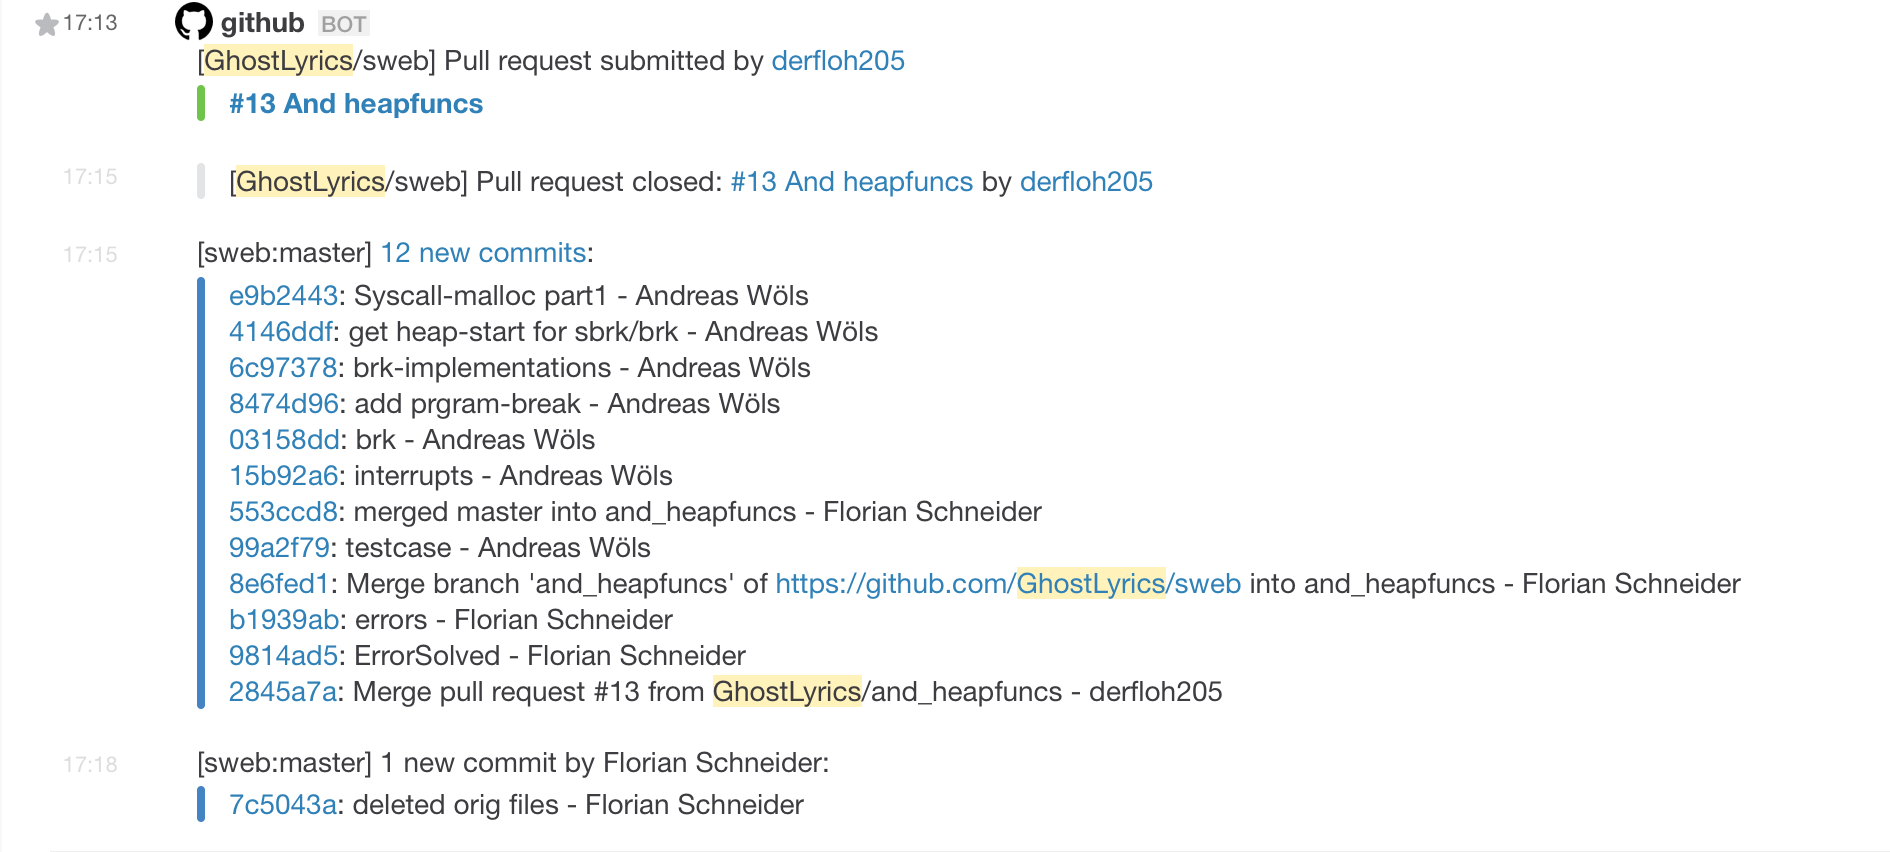
Screenshot of github bot in slack

Since it is quite likely for you to work with team members on other operating systems, Slack is available for Windows and a open source client for Linux called Scudcloud exists and works pretty well.

Github + Github Client

In order to have the bot automatically post into our Slack channel, it was necessary for us to either have a properly set up gitlab or a github repository. Since I didn’t want to abuse my connections at work for gitlab accounts and the IAIK, the institute which teaches Operating Systems, does not (yet?) host the repositories for the course on their gitlab, working on github was necessary. Of course we were required to use a private repository lest all visitors could see and potentially steal our code.

Github offers its micro plan free for students. This plan include 5 private repositories. My plan had expired, so I paid for a month until they could reinstate my discount due to me still being a student.

Github also offers a quite simplistic and easy to use graphical interface for git which makes branching, merging and committing as well as sync delightfully fast and easy. Of course plenty of diving into the command line was still necessary due to the need to push to the assignment repository from time to time, etc.

However, we were able to do a lot of time intensive things like Code Review or merges from the web interface - it has helpful features such as an indicator whether a Pull Request can be merged without conflicts; this is extremely helpful when merging features back into master.

I’ll explain a bit more about some strategies for this group project [in a separate post][sanity].

Due to the need for our code to be exactly the same in the assignment repository as in the github repository I mirrored the code manually before each deadline (and sometimes more often), using commands from a github help page. I even wrote an bash alias for the command which needed to be called repeatedly (from ~/.bash_profile):

alias push='git fetch -p origin && git push --mirror'

bash git prompt

My shell of choice is bash since it’s the default for most systems. In order to have similar features to the zsh configuration recommended by the SWEBwiki you may install an improved prompt for bash with git support. [github]

These lines in my ~/.bash_profile show my prompt configuration for bash-git-prompt:

if [ -f "$(brew --prefix bash-git-prompt)/share/gitprompt.sh" ]; then
  GIT_PROMPT_THEME=Custom
  GIT_PROMPT_ONLY_IN_REPO=1
  source "$(brew --prefix bash-git-prompt)/share/gitprompt.sh"
fi

export PS1="________________________________________________________________________________\n| \[\e[0;31m\]\u\[\e[m\]@\h: \w \n| ="" \[\e[m\]"
export PS2="\[\e[38;5;246m\]| ="" \[\e[m\]"

In order to keep it consistent with my standard prompt here are the settings I override for the custom theme in ~/.git-prompt-colors:

GIT_PROMPT_START_USER="________________________________________________________________________________\n| \[\e[0;31m\]\u\[\e[m\]@ \h: \w \n|"
GIT_PROMPT_END_USER=" ="" "

iTerm & Terminal

For my work as system administrator at the ICG I strongly prefer a terminal emulator which has native support for split panes without relying on GNU screen. I usually work with a Nightly Build of iTerm 2. However, there was an issue with color codes which are extremely important when working with SWEB that made me change to Apple’s build-in Terminal for the course.

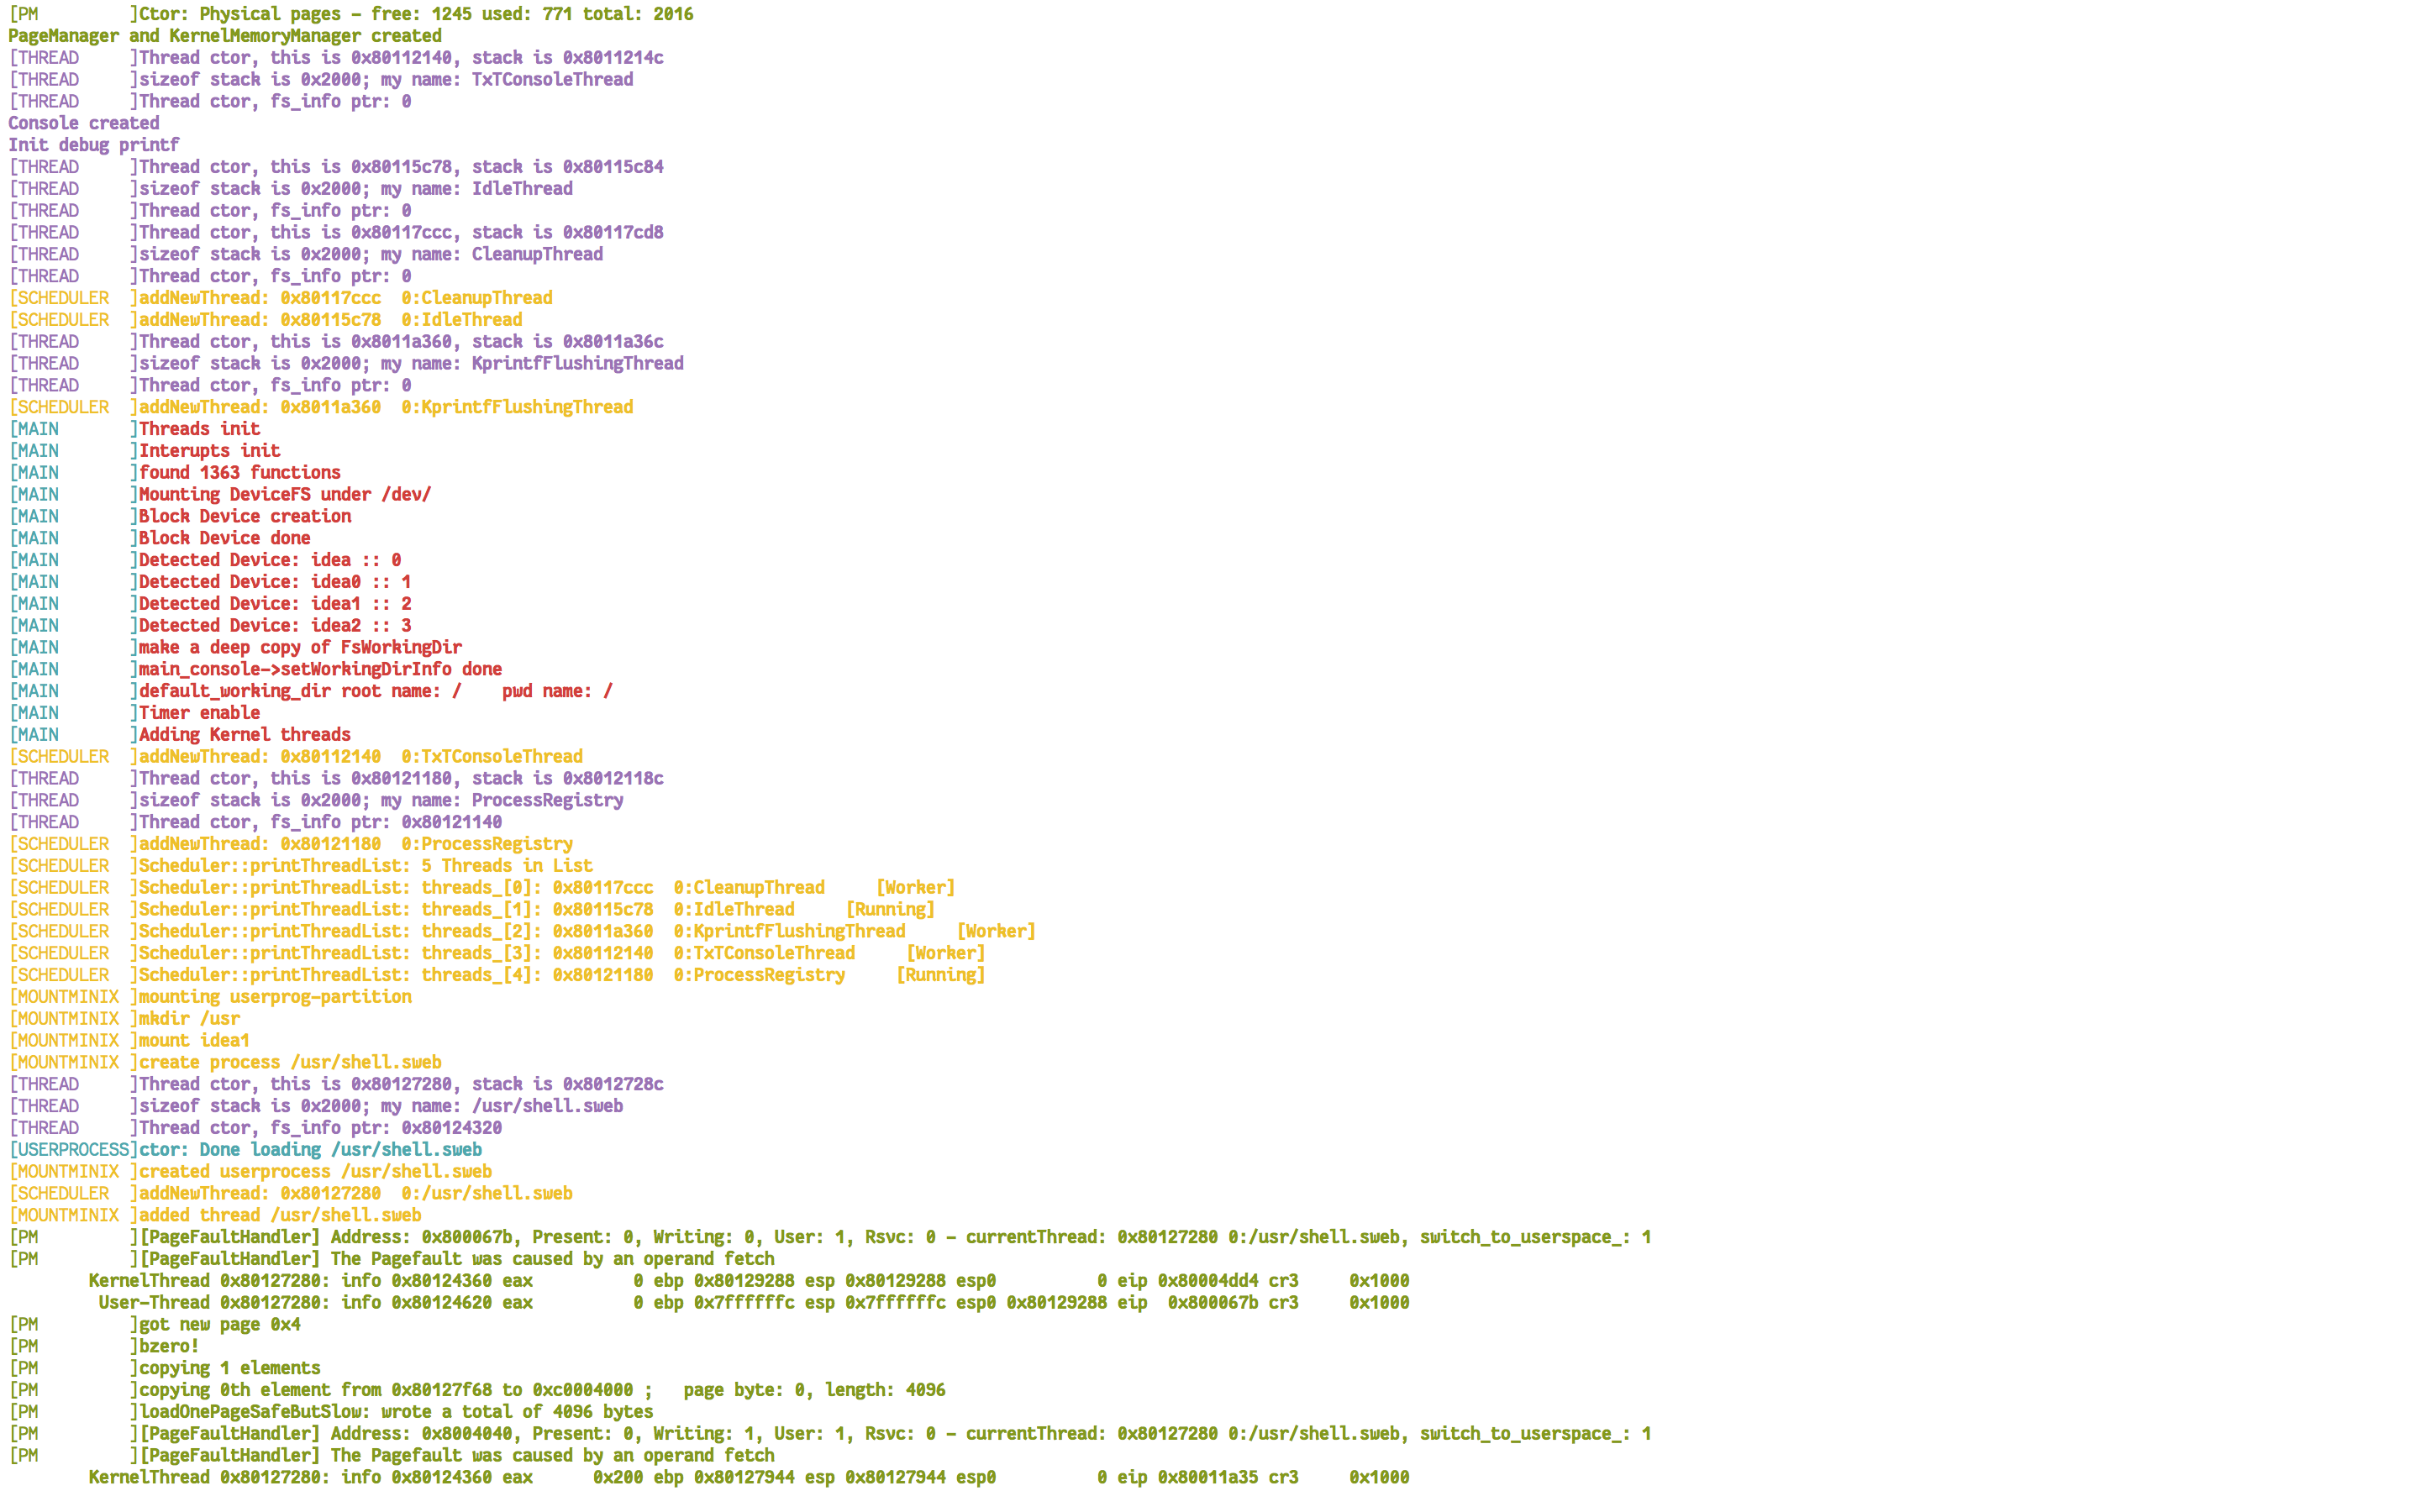
Have a look for yourself, the first image is the output with iTerm 2, while the bottom image is the output with Apple’s Terminal.

SWEB running on iTerm 2

SWEB running on Apple's Terminal

One more thing

There is one last recommendation I have which is not applicable on the Mac due to cross-compilation. Analyze your code with scan-build. scan-build is available in the clang Ubuntu package. Analyze it at least twice:

  1. The first step is to analyze the code immediately when you get it to know what are false positives. Well, not strictly speaking false positives, but you likely won’t be fixing the issues that come with the assignment.
  2. Then, run the analyzer again before handing in an assignment to detect and fix possible issues.

Steps for analysis, assuming you would like to use a folder separate from your regular build:

mkdir analysis
cd analysis
scan-build cmake . ../sweb
scan-build -analyze-headers -vvv -maxloop 12 make
scan-view /path/to/result

scan-view will open the scan results in your default browser. Note that I’m setting -maxloop to three times the default - further increasing this number will be very time consuming. If you want to see the result immediately after completion, you can add -V to the arguments of scan-build.

Conclusion

There are a lot of great tools out there to work on SWEB and code in general. Personally I abhor using Eclipse due to its slowness and horrible interface, not to mention the keyboard shortcuts which make little sense to a Mac user. To be perfectly honest, I’m mostly screaming and cursing within minutes of starting up Eclipse for any kind of task.

This is why I do seek out tools that are native to the Mac.


Btw. if all of these code blocks happen to have nice syntax highligthing I’ve migrated away from Wordpress or they finally managed to make their Jetpack plugin transform fenced code blocks into properly highlighted, fancy coloured text.


Tools and their experiences with SWEB is part 3 of Working on SWEB for the Operating Systems course:

  1. SWEB, qemu and a Macbook Air
  2. How to SWEB on your Mac with OS X
  3. Tools and their experiences with SWEB
  4. Retaining your sanity while working on SWEB

How to SWEB on your Mac with OS X

Posted on Fri 14 August 2015 • Tagged with University

Motivation

I initially used a Macbook Air as my main machine for university work and therefore also for the Operating Systems course. Now, you will probably be aware of this, but the Air is not the fastest laptop in town. Given that it was necessary to run the SWEB, the given operating system via qemu in a Linux virtual machine, things were already quite slow.

Furthermore, testing my group’s Swapping implementation was one of the slowest things I came across and I desperately wanted to work with a faster setup. I learned that at one point in the past SWEB had been compilable and runable on OS X.

I even stumbled across Stefan‘s build scripts on the SWEB wiki. Those were written for a system that had been migrated from several older versions all the way to OS 10.6. My machine had 10.7 as of the time of my first trials and there was no more Apple provided build of gcc available since Apple had moved on to use clang as part of their switch to LLVM.

Back then I spent two evenings with Thomas trying to get a cross compiler up and running to compile on OS X. We failed on that. Soon after that I spent some time together with Daniel who is the main person responsible for the Operating System practicals and we managed to successfully and reproducably build a working cross compiler. With that, one could build and run SWEB on OS X. Some modifications to the build scripts as well as minor modifications to the code base were necessary, but after writing those patches, one could check out and build the system provided by the IAIK.

And, well… I didn’t take the course that year, the course staff updated things in the code base and nobody bothered to check if the Mac build was indeed still building. Suffice to say another round of small fixes was required and I sat together with Daniel again. He’s the expert, I’m just the motivated Mac guy. I was asked whether I’d finally try the course again, given that I’m preparing the Mac build again. My answer was that I’d do so if we get it working before the term started and we did, so there’s that.

Requirements

  • Xcode
  • Xcode command line tools
  • git (included in Xcode command line tools)
  • homebrew
  • homebrew: tap ghostlyrics/homebrew-sweb
  • homebrew: packages: cloog, qemu, cmake, sweb-gcc

Feel free to skip ahead to the next section if you know how to install those things.

Xcode

Download and install Xcode from Apple. If you don’t have differing requirements, the stable version is strongly suggested.

Xcode command line tools

Apple stopped shipping its command line tools by default with Xcode. These are necessary to build things with our third party package manager of choice, homebrew. Install them via the wizard triggered by the following command in Terminal.app.

xcode-select --install

homebrew

Unfortunately OS X does not ship with a package manager. Such a program is quite helpful navigating the world of open source software – we use homebrew to install the dependencies of SWEB as well as the cross compiler I have prepared with extensive help from Daniel.

Install homebrew via the instructions at their site - it’s easy. Again, you’re instructed to paste one line into Terminal.app.

ghostlyrics/homebrew-sweb

Since the main architecture your SWEB runs on is i686-linux-gnu you will need a toolchain that builds its executables for said architecture.

To activate the package source enter the following command:

brew tap ghostlyrics/homebrew-sweb

Though an interesting experiment, we did not bother using a clang based toolchain since SWEB does not compile and run well on Linux with clang. Therefore it would’ve been a twofold effort to:

  1. make SWEB build with clang on Linux
  2. build a clang based cross-compiler

packages: cloog, qemu, cmake, sweb-gcc

To install the necessary packages enter the following command:

brew install sweb-gcc qemu cmake cloog

The cross-compiler we provide is based on gcc Version 4.9.1 and precompiled packages are (mostly) available for the current stable version of OS X. Should it be necessary or should you wish to compile it yourself, expect compile times of more than 10 minutes (Model used for measurement: Macbook Pro, 15-inch, Late 2013, 2,3 GHz Intel Core i7, 16 GB 1600 MHz DDR3).

Compiling your first build

You are now ready to compile your first build. Due to problems with in-source builds in the past, SWEB does no longer support those. You will need to build in a different folder, e.g. build:

git clone https://github.com/iaik/sweb
mkdir build
cd build
cmake ../sweb
make
make qemu

After running these commands you should see many lines with different colors in your main Terminal and a second window with the qemu emulator running your SWEB.

Speeding things up

While the way described in the previous section is certainly enough to get you started there a some things you can do to make your workflow speedier.

  • Compiling with more threads enabled
  • Using one command to do several things in succession
  • Chaining your commands
  • Using a RAM disk

Compile with more threads

Using a command line option for make allows you to either specify the amount of threads the program should use for the compilation process or instruct it to be “greedy” and use as many as it sees fit.

make -j OPTIONAL_INTEGER_MAXIMUM_THREAD_NUMBER

The downside to this is that since the process is not threadsafe, your terminal output will be quite messy.

Use one command to do several things

SWEB ships with a very handy make target called mrproper. This script deletes your intermediate files and runs cmake SOURCEFOLDER again. Since you need to run the cmake command for every new file you want to add, this can save some time.

make mrproper
... [Y/n]

When asked whether you want to really do this, some popular UNIX tools allow you to hit ENTER to accept the suggestion in capital letters; the same behaviour is enabled for this prompt.

Chaining your commands

You probably already know this, but shell commands can be chained. Use && to run the next command only if the previous command succeeded and use ; to run the next command in any case.

cmake . && make -j && make qemu
make -j && make qemu ; make clean

Using this technique you can simply build and run with two button presses: The arrow key up to jump through your shell history and the ENTER key to accept.

Using a RAM disk

Since you will be writing and reading a lot of small files again and again and again from your disk, it might be beneficial for both performance as well as disk health to have at least your build folder in a virtual disk residing completely in your RAM. Personally I have not done that, but since the course staff recommends that, instructions can be found here.

If you are not sure the performance differs a lot, tekrevue.com has a nice chart buried in their article, graphing the difference between a SSD and a RAM disk. To quote their post:

As you can see, RAM Disks can offer power users an amazing level of performance, but it cannot be stressed enough the dangers of using volatile memory for data storage.

To enable a RAM volume enter the following command:

# NAME: the name you want to assign, SIZE: 2048 * required amount of MegaBytes
diskutil erasevolume HFS+ 'NAME' `hdiutil attach -nomount ram://SIZE`

If you prefer a GUI for this task, the original author of this tip offers one free of charge.

Please make sure you always, always commit AND push your work if you’re working in RAM. Changes will be lost on computer shutdown, crash, freeze, etc.

Changes are preserved during sleep and hibernate. ~Daniel

Conclusion

Working on OS X natively when developing SWEB is indeed possible for the usual use case. Developing and testing architectures different from i686 however, e.g. the 64-bit build or ARM builds will still require you to use Linux (or asking your group members to work on those parts).


How to SWEB on your Mac with OS X is part 2 of Working on SWEB for the Operating Systems course:

  1. SWEB, qemu and a Macbook Air
  2. How to SWEB on your Mac with OS X
  3. Tools and their experiences with SWEB
  4. Retaining your sanity while working on SWEB

Preparing the Virtual Reality course at ICG

Posted on Mon 11 May 2015 • Tagged with Institute for Computer Vision and Computer Graphics, Work

For a while now a lot of my time working was spent on preparing the technical part of a Virtual Reality course at ICG. Since the setup was fairly complex I thought a review might be interesting.

  • This write-up contains notes on fabric, puppet, apt, dpkg, reprepro, unattended-upgrades, synergy and equalizer.
  • I worked with Daniel Brajko, Bernhard Kerbl and Thomas Geymayer on this project.
  • This post was updated 5 times.

The setup

The students will be controlling 8 desktop-style computers (“clients”) as well as one additional desktop computer (“master”) which will be used to control the clients. The master is the single computer the students will be working on - it will provide a “terminal” into our 24 (+1) display videowall-cluster.

Each of the 8 computers is equipped with a current, good NVIDIA GPU (NVIDIA GTX 970) which powers 3 large, 1080p, stereo-enabled screens positioned vertically along a metal construction. The construction serves as the mount for the displays, the computer at its back as well as all cables. Additionally, each mount has been constructed to be easily and individually movable by attaching wheels to the bottom plate. The design of said constructions, as well as the planning, organization and the acquisition of all components was done by Daniel Brajko. (You can find a non-compressed version of the image here.)

the videowall, switched off

Preparation

I could go into detail here, how my colleague has planned and organized the new Deskotheque (that the name of the lab) as well as overseen the mobile mount construction. However, since I am very thankful for not having to deal with both shipping as well as assembly, I will spare that part. Instead I will tell how one of our researchers and I scrambled to get a demo working within little to no time.

All computers were set up with Ubuntu 14.04. We intended to use puppet, which was initially suggested by Dieter Schmalstieg, the head of our institute, from the start. At that time our puppet infrastructure was not yet ready, so I had to set up the computers individually. After installing openssh-server and copying my public key over to the computer I used Python fabric scripts I’ve written to execute the following command:

fabric allow_passwordless_sudo:desko-admin 
  set_password_login:False change_password:local -H deskoN

This command accessed the host whose alias I had previously set up in my ~/.ssh/config. The code for those commands can be found on Github. The desko-admin account has since been deleted.

A while later our puppet solution was ready and we connected those computers to puppet. There is a variety of tasks that is now handled by puppet:

  • the ICG apt repository is used as additional source (this happens before the main stage)
  • a PPA is used as additional apt source to enable the latest NVIDIA drivers (this happens before the main stage)
  • NVIDIA drivers, a set of developer tools, a set of admin tools, the templates, binaries and libraries for the VRVU lecture are installed.
  • unattended_upgrades, ntp, openssh-server are enabled and configured.
  • apport is disabled. (Because honestly, I have no clue why Ubuntu is shipping this pain enabled.)
  • deskotheque users are managed
  • SSH public keys for administrative access are distributed

Demos

First impression

If you don’t care for ranting about Ubuntu, please skip ahead to moving parts, thank you. Setting up a different wallpaper for two or more different screens in Ubuntu happens to be a rather complicated task. For the first impression I needed to:

  • log in as desko-admin
  • create the demo user account
  • have demo log in automatically
  • log in via SSH as desko-admin
  • add PPA for nitrogen
  • install nitrogen and gnome-tweak-tool
  • copy 3 distinct pictures to a given location on the system
  • log in as demo
  • disable desktop-icons via gnome-tweak-tool
  • set monitor positions (do this the second time after doing it for desko-admin because monitor positions are account-specific. This, btw, is incredibly stupid.)
  • set images via nitrogen (because who would ever want to see two different pictures on his two screens, right?)
  • disable the screen saver (don’t want people having to log in over and over during work)
  • enable autostart of nitrogen (that’s right, we are only faking a desktop background by starting an application that runs in the background)

Only after this had been done for every single computer, a big picture was visible: all the small images formed one big photograph and made an impressive multi-screen wallpaper - at least if you stood back far enough not to notice the pixels. Getting a picture that’s 3*1080 x 8*1920 is rather hard, so we upscaled an existing one.

The result of this pain is: One switches on all computers and they all start displaying parts of the same picture, logged in via the same account. You can immediately start a demo using all screens with this user. (This procedure was made even more simple by having puppet deploy SSH public and private keys for this user - so you instantly jump from one deskotheque computer to another if you’re demo.)

Moving parts

For the first big demo for a selected number of people during WARM 2015 I worked together with Thomas Geymayer which is the main developer of our in-house fork of synergy on setting up said program. It took us some attempts to get everything working in the first place since he had used Ubuntu 14.10 for development. The cluster however used the current 14.04 LTS I had rolled out earlier. Since by then the puppet solution wasn’t ready, we spent two frantic days copying, trying, compiling, trying again and copying via SFTP between the individual nodes in order to get everything to work properly. Thomas had to rework some of the implementation since our fork was originally invented for presenting, not remote-control of several devices which he did in admirably little time. Though we had some issues during the presentation the attendees seemed interested and impressed by our setup.

Soon after that deadline I prioritized finishing our puppet solution since I got very, very annoyed manually syncing directories.

Equalizer

Bernhard Kerbl wanted to work with the Equalizer framework in order to enable complex rendering tasks. Each of the computers in the cluster is supposed to compute a single part of the whole image (or rather 3 parts given that 3 monitors are connected to each node). The parts of the whole image must be synchronized by the master, so that the whole image makes sense (e.g. no parts of the image may be further ahead in a timeline than the others). Usually I expect bigger projects to either offer Ubuntu packages, prebuilt Linux binaries or even a PPA. Their PPA doesn’t offer packages for the current Ubuntu LTS though, so we ended up compiling everything ourselves.

That took a while, even after figuring out that one can make apt-get and use Ubuntu packages instead of compiling libraries like boost from source. After some trial and error we arrived at a portable (by which I mean “portable between systems in the cluster”) solution. I packaged that version using fpm. Since the students will be using the headers and libraries in the framework we could not simple ship that package and be done with it, we also had to ensure that everything could be compiled and run without issue. The result of that is a package with equalizer libraries and almost everything else that was built which has a sheer endless list of dependencies since we had to include both buildtime and runtime dependencies.

In order to package everything, we installed all the depencies, built out of source and packaged everything with fpm.

fpm \
-t deb \
-s dir \
--name "vrvu-equalizer" \
--version "1.0.1" \
--license "LGPL" \
--vendor "ICG TU Graz" \
--category "devel" \
--architecture "amd64" \
--maintainer "Alexander Skiba <skiba@icg.tugraz.at>" \
--url "https://gitlab.icg.tugraz.at/administrators/script-collection" \
--description "Compiled Equalizer and dependency libraries for LV VRVU
" \
--exclude "vrvu-equalizer.sh" \
--exclude "opt.zip" \
--verbose \
-d debhelper \
-d dh-apparmor \
-d gir1.2-gtk-2.0 \
-d icu-devtools \
-d libaacs0 \
-d libarmadillo4 \
-d libarpack2 \
-d libatk1.0-dev \
-d libavahi-client-dev \
-d libavahi-common-dev \
-d libavahi-compat-libdnssd1 \
-d libavcodec-dev \
-d libavcodec54 \
-d libavdevice53 \
-d libavformat-dev \
-d libavformat54 \
-d libavutil-dev \
-d libavutil52 \
-d libbison-dev \
-d libblas3 \
-d libbluray1 \
-d libboost-date-time1.54-dev \
-d libboost-program-options1.54-dev \
-d libboost-program-options1.54.0 \
-d libboost-regex1.54-dev \
-d libboost-regex1.54.0 \
-d libboost-serialization1.54-dev \
-d libboost-serialization1.54.0 \
-d libboost-system1.54-dev \
-d libboost1.54-dev \
-d libc6 \
-d libcairo-script-interpreter2 \
-d libcairo2-dev \
-d libcoin80 \
-d libcv-dev \
-d libcvaux-dev \
-d libdap11 \
-d libdapclient3 \
-d libdbus-1-dev \
-d libdc1394-22 \
-d libdc1394-22-dev \
-d libdrm-dev \
-d libepsilon1 \
-d libexpat1-dev \
-d libfaad2 \
-d libfl-dev \
-d libfontconfig1-dev \
-d libfreetype6-dev \
-d libfreexl1 \
-d libgdal1h \
-d libgdk-pixbuf2.0-dev \
-d libgeos-3.4.2 \
-d libgeos-c1 \
-d libgfortran3 \
-d libgif4 \
-d libglew-dev \
-d libglewmx-dev \
-d libglib2.0-dev \
-d libglu1-mesa-dev \
-d libgraphicsmagick3 \
-d libgsm1 \
-d libgtk2.0-dev \
-d libgtkglext1 \
-d libharfbuzz-dev \
-d libharfbuzz-gobject0 \
-d libhdf4-0-alt \
-d libhdf5-7 \
-d libhighgui-dev \
-d libhwloc-plugins \
-d libhwloc5 \
-d libibverbs1 \
-d libice-dev \
-d libicu-dev \
-d libilmbase-dev \
-d libilmbase6 \
-d libiso9660-8 \
-d libjasper-dev \
-d libjbig-dev \
-d libjpeg-dev \
-d libjpeg-turbo8-dev \
-d libjpeg8-dev \
-d libkml0 \
-d liblapack3 \
-d liblzma-dev \
-d libmad0 \
-d libmail-sendmail-perl \
-d libmng2 \
-d libmodplug1 \
-d libmp3lame0 \
-d libmpcdec6 \
-d libmysqlclient18 \
-d libnetcdfc7 \
-d libodbc1 \
-d libogdi3.2 \
-d libopencv-calib3d-dev \
-d libopencv-calib3d2.4 \
-d libopencv-contrib-dev \
-d libopencv-contrib2.4 \
-d libopencv-core-dev \
-d libopencv-core2.4 \
-d libopencv-features2d-dev \
-d libopencv-features2d2.4 \
-d libopencv-flann-dev \
-d libopencv-flann2.4 \
-d libopencv-gpu-dev \
-d libopencv-gpu2.4 \
-d libopencv-highgui-dev \
-d libopencv-highgui2.4 \
-d libopencv-imgproc-dev \
-d libopencv-imgproc2.4 \
-d libopencv-legacy-dev \
-d libopencv-legacy2.4 \
-d libopencv-ml-dev \
-d libopencv-ml2.4 \
-d libopencv-objdetect-dev \
-d libopencv-objdetect2.4 \
-d libopencv-ocl-dev \
-d libopencv-ocl2.4 \
-d libopencv-photo-dev \
-d libopencv-photo2.4 \
-d libopencv-stitching-dev \
-d libopencv-stitching2.4 \
-d libopencv-superres-dev \
-d libopencv-superres2.4 \
-d libopencv-ts-dev \
-d libopencv-ts2.4 \
-d libopencv-video-dev \
-d libopencv-video2.4 \
-d libopencv-videostab-dev \
-d libopencv-videostab2.4 \
-d libopencv2.4-java \
-d libopencv2.4-jni \
-d libopenexr-dev \
-d libopenexr6 \
-d libopenjpeg2 \
-d libopenscenegraph99 \
-d libopenthreads-dev \
-d libopenthreads14 \
-d libopus0 \
-d libpango1.0-dev \
-d libpci-dev \
-d libpcre3-dev \
-d libpcrecpp0 \
-d libpixman-1-dev \
-d libpng12-dev \
-d libpostproc52 \
-d libpq5 \
-d libproj0 \
-d libpthread-stubs0-dev \
-d libqt4-dev-bin \
-d libqt4-opengl-dev \
-d libqt4-qt3support \
-d libqtwebkit-dev \
-d libraw1394-dev \
-d libraw1394-tools \
-d librdmacm1 \
-d libschroedinger-1.0-0 \
-d libsm-dev \
-d libspatialite5 \
-d libspnav0 \
-d libswscale-dev \
-d libswscale2 \
-d libsys-hostname-long-perl \
-d libtbb2 \
-d libtiff5-dev \
-d libtiffxx5 \
-d libudt0 \
-d liburiparser1 \
-d libva1 \
-d libvcdinfo0 \
-d libx11-doc \
-d libx11-xcb-dev \
-d libx264-142 \
-d libxau-dev \
-d libxcb-dri2-0-dev \
-d libxcb-dri3-dev \
-d libxcb-glx0-dev \
-d libxcb-present-dev \
-d libxcb-randr0-dev \
-d libxcb-render0-dev \
-d libxcb-shape0-dev \
-d libxcb-shm0-dev \
-d libxcb-sync-dev \
-d libxcb-xfixes0-dev \
-d libxcb1-dev \
-d libxcomposite-dev \
-d libxcursor-dev \
-d libxdamage-dev \
-d libxdmcp-dev \
-d libxerces-c3.1 \
-d libxext-dev \
-d libxfixes-dev \
-d libxft-dev \
-d libxi-dev \
-d libxine2 \
-d libxine2-bin \
-d libxine2-doc \
-d libxine2-ffmpeg \
-d libxine2-misc-plugins \
-d libxine2-plugins \
-d libxinerama-dev \
-d libxml2-dev \
-d libxml2-utils \
-d libxrandr-dev \
-d libxrender-dev \
-d libxshmfence-dev \
-d libxvidcore4 \
-d libxxf86vm-dev \
-d mesa-common-dev \
-d mysql-common \
-d ocl-icd-libopencl1 \
-d odbcinst \
-d odbcinst1debian2 \
-d opencv-data \
-d po-debconf \
-d proj-bin \
-d proj-data \
-d qt4-linguist-tools \
-d qt4-qmake \
-d x11proto-composite-dev \
-d x11proto-core-dev \
-d x11proto-damage-dev \
-d x11proto-dri2-dev \
-d x11proto-fixes-dev \
-d x11proto-gl-dev \
-d x11proto-input-dev \
-d x11proto-kb-dev \
-d x11proto-randr-dev \
-d x11proto-render-dev \
-d x11proto-xext-dev \
-d x11proto-xf86vidmode-dev \
-d x11proto-xinerama-dev \
-d xorg-sgml-doctools \
-d xtrans-dev \
-d zlib1g-dev \
.

In the last weeks before this article, I’ve seen a 3D rendering on almost all screens of the cluster which was great. I enjoy seeing people use systems I helped building.

Puppet: apt or dpkg

Having a prepared .DEB file didn’t solve all my trouble though. I had two options for installing the file via puppet: apt or dpkg. Well, this was troubling. dpkg does not understand dependencies if used in this way - a bad thing given that the dependencies of our vrvu-equalizer package were a pretty long list. apt however didn’t offer to use a source parameter - therefore we had to offer a way to install the package from a repository.

After a bit of research I decided to set up an in-house repository for the institute, hosting those packages which we cannot comfortably use from other sources. At the time of this writing it holds patched versions of unattended-upgrades for Trusty, Precise, Wheezy and Jessie as well as our vrvu-equalizer version for Trusty. (I recommend against using our repository for your computers since I haven’t found the time to repair the slightly broken unattended-upgrades for systems other than Jessie.)

deb https://data.icg.tugraz.at/packages <codename> main

I created the repository using reprepro and we sign our packages with the following key: https://data.icg.tugraz.at/packages/ICG-packages.key.

Unattended-upgrades

I’ve automated installation of upgrades on most of our Linux based machines at the institute mostly due to the fact that I don’t want to babysit package upgrades when security critical updates are released. *cough* openssl *cough* However, I’ve run into one problematic issue. I’ve run out of space on the /boot partition due to frequent kernel updates which don’t remove the previous kernels.

I’ve since set the Remove-unused-dependencies parameter, but that didn’t do everything I wanted. This parameter only instructs the script to remove dependencies that happen to be no longer needed during this run. Dependencies which were “orphaned” before the current run will be ignored. This means that manual upgrades have the potential to lead to orphaned packages which remain on the system permanently.

Since the unattended-upgrades script is written in Python, I took a stab at implementing the functionality I wanted to have for use with our installations. After I had done that, I packaged everything for Ubuntu Precise Pangolin, Ubuntu Trusty Tahr and Debian Wheezy and put everything in our ICG apt repository to have it automatically installed.

Unattended-upgrades, again

A review of my previous modification to unattended-upgrades was necessary since root kept getting mail from the cronjob associated with unattended-upgrades even though I had specifically instructed the package via puppet to only do so in case of errors. Still, every few days, we would get emails containing the output of the script. Here’s an example.

/etc/cron.daily/apt:
debconf: unable to initialize frontend: Dialog
debconf: (TERM is not set, so the dialog frontend is not usable.)
debconf: falling back to frontend: Readline
debconf: unable to initialize frontend: Readline
debconf: (This frontend requires a controlling tty.)
debconf: falling back to frontend: Teletype
dpkg-preconfigure: unable to re-open stdin: 
(Reading database ... 117338 files and directories currently installed.)
Preparing to replace subversion 1.6.17dfsg-4+deb7u8 (using .../subversion_1.6.17dfsg-4+deb7u9_amd64.deb) ...
Unpacking replacement subversion ...
Preparing to replace libsvn1:amd64 1.6.17dfsg-4+deb7u8 (using .../libsvn1_1.6.17dfsg-4+deb7u9_amd64.deb) ...
Unpacking replacement libsvn1:amd64 ...
Processing triggers for man-db ...
debconf: unable to initialize frontend: Dialog
debconf: (TERM is not set, so the dialog frontend is not usable.)
debconf: falling back to frontend: Readline
debconf: unable to initialize frontend: Readline
debconf: (This frontend requires a controlling tty.)
debconf: falling back to frontend: Teletype
Setting up libsvn1:amd64 (1.6.17dfsg-4+deb7u9) ...
Setting up subversion (1.6.17dfsg-4+deb7u9) ...

I am currently in the process of solving this by rewriting my modification in a cleaner, more structured way - a way which is a lot more influenced by the original script, keeping in mind that the necessary environment variable for debconf is set in the execution path.

My initial error with this was that cache.commit() in the script immediately applied all changes made to the cache. While I intended to only apply the deletion of marked packages at the point of my call to the method, this meant that all changes got applied - even those for installing/upgrading new packages. The script returned prematurely and stdout got written to. This in term meant that root would get mail, since root always receives mail of cronjobs produce output.

Update 1: While my current progress does no longer call commit prematurely, it still sends me e-mails. I probably forgot to return True somewhere.

Update 2: In the meantime I think I fixed that issue by returning the success status of the auto-removal process and assigning it to the pkg_install_success variable if it does not already contain an error.

Update 3: Fixed every issue I found and submitted a pull request on Github. However, I don’t know if it will be accepted since I implemented my preferred behaviour instead of the old one. I am not sure whether I should’ve added an additional parameter instead.

Update 4: Pull request was merged. Unfortunately I will be stuck patching my older systems, however.

Update 5: The change in behaviour implemented by me has been cherry-picked for both Ubuntu Trusty and Ubuntu Precise, both currently active LTS versions during the time of this writing, so I’m quite proud of my contribution having such a great reach and have removed the patched versions from the ICG repositories.


Media Recap: Q1 2015

Posted on Sun 03 May 2015 • Tagged with Media Recap

It’s all there. Great books, diverse games, some movies and a whole lot of educational presentations.

Video Games

I’m trying something different this year: In order to avoid buying loads of games that I don’t play at all, I only buy one game per month. I’m blaming all those Steam sales for that one. Furthermore, that game is mostly something that’s at least partially randomly generated and without much story content. This is in order to have some shorter games while I play the longer, story-heavy titles (of which I possess quite a collection) together with my girlfriend. In essence, I want to avoid replaying and therefor sucking the fun out of great stories.

  • Audiosurf 2 (Steam, Early Access) - Enjoyable. Still needs work though. Game sometimes crashes, autofind music is problematic. Updates unfortunately very infrequently.
  • The Bridge (XBLA, link goes to Steam) - Puzzling Puzzles. Non of them obvious. Gimmick is rotating the screen to abuse gravity. Solved together without looking up solutions.
  • Craft the World (Steam) - Tried campaign, got frustrated rather quickly, so maxed out tech tree in a sandbox game, lost interest after that.
  • Darkest Dungeon (Steam, Early Access) - Strong Recommendation, dark, gritty, hard. Works well. Updates frequently.
  • Dungeon of the Endless (Steam, free weekend)
  • The Elder Scrolls Online: Tamriel Unlimited (“Welcome back” weekend) - For some reason TES:Online fails to entertain me every time I try it, be it the beta back then, or this recent free weekend.
  • Kingdom Hearts 1 Final Mix HD (PS3, part of Kingdom Hearts 1.5 HD ReMIX collection) - Simple and Clean.
  • Kingdom Hearts Re:Chain of Memories HD (PS3, part of Kingdom Hearts 1.5 HD ReMIX collection)
  • Ratchet & Clank HD (PS3, part of Ratchet & Clank collection) - Tried to get more achievements. Whoever drafted “Get 1.000.000 bolts” seemed not have had any idea just how long that was going to take.
  • Secret Files 3 (Steam) - Tried this one with my parents and the girlfriend as entertainment for an evening instead of agreeing on a movie. Mild success, but the parents said it was refreshingly different to watching a movie. We sat on the large couch together and collaboratively solved riddles. I liked that quite a lot.
  • Shattered Planet (Steam) - Bought recently. Seems laden with puns and pop culture references, which is a good thing.
  • Sunless Sea (Steam, was Early Access) - I need to figure out how to make this less blurry on my Retina screen.
  • The Witcher Adventure Game (Steam) - Successfully got the girlfriend interested in the Witcher books with this digital board game.

In addition to playing the Kingdom Hearts games, we also watched the Kingdom Hearts 358/2 Days videos that come with the 1.5 HD ReMIX, in order to get a grasp of what happened in that game. I was tempted to make sense of both timeline and canon of Kingdom Hearts here, but remembered better than to do that for a series that convoluted.

Books

  • Bound by Law by James Boyle, Jennifer Jenkins and Keith Aoki - Great comic about copyright law in the US.
  • Ghost in the Wires by Kevin Mitnick - Enlightening insight into social engineering.
  • Halloween Frost by Jennifer Estep - Mythos Academy bonus material
  • Saved at Sunrise by C.C. Hunter - Shadow Falls bonus material

Daniel Faust

I first came across Daniel Faust by Craig Schaefer in the newsletter of StoryBundle a pay-what-you-want book sale similar to the popular Humble Bundle. For some reason I can’t quite put a finger on, I never use these opportunities but end up buying single titles of such bundles later. I put a few books onto my reading list.

Right after I finished the first book and even while I was still considering if this was inspired by Constantine or just stealing ideas I ordered the next and then the next in the series. I heartily recommend books in the Daniel Faust universe if you happen to like mature, demon-infested novels.

Web Series

This time the Extra Credits team’s Extra History section was another mini-series spanning 5 episodes the South Sea Bubble in England. There doesn’t seem to be a link to only this section, so here’s the full Extra History playlist.

Until recently I haven’t been aware of Youtube gaming celebrity TotalBiscuit, the cynical brit. While opinions about his personality may differ, I find his “WTF is …?” a good overview of recent games.

  • Bloodsports TV
  • Convoy
  • Hand of Fate
  • Hero Generations
  • Ironcast
  • Kaiju-A-GoGo
  • Sid Meier’s Starships
  • There Came an Echo
  • Sunless Sea
  • War for the Overworld

Due to a recommendation I watched Last Week Tonight with John Oliver: Government Surveillance (HBO) on Youtube, which I am not sure to recommend. It gives a frightening picture of the American people but is painfully embarrasing to watch.

Netflix

31C3 Presentations

After talking about the copier presentation at work I remembered having saved Fefe’s recommendations of 31C3 topics and had a look through that as well as the complete list of 31C3 talks available for streaming at media.ccc.de. Initially I was overwhelmed due to the amount of interesting presentations, but I moved most of the ones that sparked my curiosity to my Instapaper list anyway.

I watched too many talks to be able to pick a definitive best. If I had to pick one for entertainment value I’d suggest the one about copier errors, since it was both hilarious and less technical, so can be recommended to people who are not tech nerds too.

Let’s Play

Official Game Additions

In order to obtain both the soundtrack as well as maps and other PDF material I acquired both Alan Wake and The Witcher 2. Have been reading comics, watching Making-Ofs and similar activities related to that fan material.

  • Alan Wake
  • The Witcher 2

A Letter to the Dev: thoughts about Audiosurf 2's "Autofind Music"

Posted on Thu 15 January 2015 • Tagged with Video Games

Dear Dylan,

First of all, I tremendously enjoy playing Audiosurf 2. I bought it as soon as it was available on OS X. I longed for that to happen since one of my favorite games I had to leave behind when switching operating systems was Audiosurf (1). While I personally find Mono a little harder than in AS1 (or do I recall it having an “easy” mode?) I still love every minute I play.

However, I am of the confound impression that the “autofind music” feature is not well implemented. From this forum thread I gather that before you were not scanning external disks. Right now, you are doing some things that are worse and will probably result in the scan never finishing its run. Here are some recommendations on how to make it better.

  • Build either a blacklist or whitelist of folders, with the content of that varying by operating system (Windows, OS X, Linux)
  • Exclude system folders
  • Set a maximum amount of depth that you follow symlinks / NTFS junctions. The lower, the better.
  • Think about implementing a time-out. (This is not necessarily a good idea, just something to think about when you’re scanning for more than, say, 30 minutes.)

Here are some suggestions for exclusions, prefixed by operating system for your convenience:

  • OS X: ~/Library (contains preferences, caches, etc for your user account)
  • OS X: /Volumes/Time Machine (contains the external copy of time machine, the Apple provided backup system)
  • OS X: /Volumes/MobileBackups (contains the local version of time machine, enabled for all laptops on which Time Machine is active)
  • OS X: /Volumes/BOOTCAMP (NTFS volume which is there when someone enables dual-booting with Windows on their Mac)
  • OS X: Generally don’t read outside of a user’s home, unless it’s a portable device (/Volumes/…)
  • OS X: Don’t access hidden folders (starting with “.”)
  • Windows: C:\Windows (system components)
  • Windows: C:\Program Files (installation data)
  • Windows: C:\Program Files(x86) (installation data for 32bit applications on 64bit systems)
  • Windows: %appdata%, %localappdata% and %appdata%/…/locallow (Microsoft explains this better than I would)
  • Linux: Generally don’t read outside of a user’s home, unless it’s a portable device (/mnt/…, /media/…, /mount/…)
  • Linux: Don’t access hidden folders (starting with “.”)

I have built this list in order to try and help you make AS2 an even greater game which actually finishes automatically finding my music instead of digging through my local and external backups, accidentally indexing music that might be gone the next time and following potential symlink circles. I sincerely hope this helps you.

Regards GhostLyrics

I originally wrote this in the steam forums, however it might be useful to keep around in case someone needs advice on the same topic.


Media Recap: Q4 2014

Posted on Fri 02 January 2015 • Tagged with Media Recap

I have not stopped writing down my consumed media. Neither do I feel the need to stop sharing them with you. However, my current schedule happens to exhaust me a lot easier than previous ones. It is because of this change in workload and scheduling that I need to change my Media Recap series to 4 times a year instead of every month. Here’s what I checked out in Q4 2014.

Presentations

You need to have watched this presentation. I am fully aware than it seems long and sometimes long-winded but it is essential for your understanding why IT infrastructure is again and again undermined by politics. Germany’s De-Mail is just one of the examples why politics cannot be responsible for the security of data.

Movies

TV series

We subscribe to Netflix and while the girlfriend mainly insists on watching movies together, I take the dive into a complete season of TV series from time to time. I’ve known Prison Break from TV back than but never got around. Elementary and Grimm play to my fondness of Crime and Mystery.

Games

  • Guild Wars 2 - didn’t play a lot even though new story snippets were released, logged in at the end of the year to unlock the Wintersday tree for the home instance
  • Mass Effect 2 - finished one last playthrough, please send help. Girlfriend dragged me through this.
  • Fruit Ninja HD: Puss in Boots - Evergreen. Played one evening, broke own record.
  • Risk of Rain - I suck at this. Devastatingly difficult. Still like it.
  • Letter Quest - Scrabble-like combat system for a tiny RPG. Has obvious display of removed IAPs than were converted to in-game currency on the PC version. Adorable graphics, lots of fun but requires at least intermediate grasp of English language.
  • Ratchet & Clank - Nostalgia flash. Must’ve been more than 9 years ago that I played that one last. Bought on PSN during the holiday sale.
  • SSX - Needed to see whether this is a worthy successor to SSX 3. Mostly, it’s not. The dangers suck, the parks I’ve seen so far are not as over the top. I find it to be less fun than 3. It’s unnecessarily restrictive. A lot better than Stoked and Shaun White Snowboarding however if you like non-realistic snowboarding. No buy if you dislike the Deadly Descents - I certainly don’t.
  • Fallen London - I got into Fallen London. I soaked up its lore. I spent almost every minute of waiting during another activity playing the game. I even ended up converting a friend to the game and making item conversion tables to avoid more round-trips to the wiki.
  • Sunless Sea - A gift from my girlfriend since I spend so much time and effort on Fallen London. I sure wish the game supported either a higher resolution or retina-level graphics given that has heavy emphasis on text and the text is awfully blurry on this glorious screen.

Books

Podcasts

Web series

  • Extra History - The Punic Wars
  • Extra History - The Seminal Tragedy
  • Extra History - Sengoku Jidai

Extra History uses the popular combination of humorous drawings with neatly narrated information for specific periods in history in the same entertaining way that Extra Credits already did for video game development insight.

Let’s Plays

  • Dangan Ronpa was a hilarious, insane and extremely weird read and reminded me strongly of the Persona series whose Lets Plays I enjoyed a lot in the past.

State of e-mail 2014

Posted on Sat 27 December 2014

I’ve been chatting with @stefan2904 about mail clients recently and we came to the conclusion that we’re rather unsatisfied with the current status of desktop mailing software.

Only a few weeks back I’ve reorganized my complete e-mail workflow again. I’ve done this once before and it was unpleasant the first time, it was still annoying the second time. Moving your mails from one provider to another one is crappy, slow and error prone - the more advanced tools are complicated and not suited for an impatient mood. I’m not sure what the preferred tool for this task is but migrating your existing mails with Apple Mail or Thunderbird is every bit as shitty as it sounds. (CMD+A, drag to folder on other mail provider, wait for timeout to occur, repeat)

Anyway. My previous setup looked like this:

  • IMAP (standard, or rather sub-standard) at my website host whose SquirrelMail web interface is crappy and its filtering sucks in every single category you can think of, be that spam or rules for regular mail.
  • IMAP (standard, but somewhat better) Horde mail interface at my institute at university.
  • Exchange (the name is precisely the activity I wanted to do with it) mail for university, directly at university
  • iCloud IMAP (sub-standard) holy shit. I’ve wanted to switch to iCloud for its Push delivery of new mail to my iOS devices. I’ve never before seen such a ridiculous spam-reporting technique. You are supposed to forward mail that their filter has missed to a special address. iCloud really completely blocks spam instead of collecting it in a dedicated folder like Gmail does.

In essence, I had all those accounts set up on all of my devices (3, about to become 4) and that led to the occasional confusion and a lot of micromanagement for identities and preferences when setting up a device or changing a tiny detail.

There were a few points I intensely disliked about former setup, the most annoying one getting spam onto my mobile phone. Since there is no automated spam filtering in the iOS world you have to rely on your server component. If your server part happens to be crap, you are syncing every tiny piece of unwanted mail to mobile devices regardless of its importance (read: spam is not important). That means more irrelevant notifications and less battery life. I arrived at this setup after realizing I wanted Push notifications for at least some of my mails. Newer versions of iOS do not provide Push for Gmail accounts, so I switched everything to iCloud.

However, working with multiple e-mail accounts, aliases and different push/fetch settings as well as redirects quickly proved painful and actively discouraged me from using my preferred address, the one associated with my domain.

To Google again

In order to remedy this, as well as get better push support I’ve moved back to Gmail. Since Gmail support for iOS is not exactly the best (although quite good) and the Gmail iOS app feels more like a wrapper arounds its website than a responsive app, I’ve also decided to make Mailbox my new mail client on both iOS and OS X (admittedly, the desktop version is only in beta stage at the moment but it works okay).

Another big reason for my renewed use of Gmail is its automated spam filtering: In contrast to other solutions which require you to follow a certain process for reporting spam Gmail allows you to simply move an unwanted mail to its Junk folder via IMAP. Learning will happen automatically on the server side. Let me repeat this again, so you can appreciate it better: There is no need to create rules or other procedures to combat spam other than marking unwanted mails as spam when they arrive.

What works great

Swiping is a great interaction method for clearing messages quickly. Auto-swipes sync across your devices (as the should). While it would be preferable to have absolutely all filtering on the server-side, creating simple rules is extremely fast and very handy. Due to the Dropbox integration, both rules and preferences sync to your other devices if you choose so.

In contrast to Google’s Inbox which I’ve also tested for a few hours, I vastly prefer the simple white interface to Google’s Material Design. As you are probably aware, Google tries its best to keep you immersed in their ecosystem, which makes working harder on iOS if you prefer to use tools from multiple companies.

What’s decidedly bad

Desktop

It seems like there is no (outgoing) attachment support in the desktop version yet. From having a look around the forums I arrived at the conclusion that the preferred method is to put a file into one’s Dropbox and send the link to that. I am curious if this will be automated via the GUI in the future.

While drafts are accessible on the desktop, it’s simply not possible to save a draft. I’ve tried hitting CMD+S, I’ve checked whether there is a prompt on closing an unsaved message, I’ve double-checked the menus for an option regarding saving of drafts. It seems like I will keep my habit of keeping e-mails as short as possible.

Mobile

Mailbox for iOS seems to choke on particularly long e-mails - even on the latest iPad (iPad Air 2), so I assume it is not a CPU problem. Since this only happens on the extremely long log file one of our server creates every day it is not a problem for me.

Another slight problem is iOS’s unwillingness to let users exchange the default mail program. While this could easily be remedied by Mailbox providing a new iOS 8 share extension, it is currently necessary for me to have my Gmail account configured in Apple’s Mail.app in order to share articles from Instapaper and Reeder easily. I’ve set the refresh to ‘manually’ to avoid syncing everything twice.